


Is there a universal boundary wire for Worx Landroid? Not in any Worx source we read. The sources describe the wire as part of each Landroid system. Worx lists its extension kit at 18 AWG and 165 ft, and its installation manual caps the total perimeter at 984 ft. Check those figures against the manual for your model before you buy any replacement wire.
The short answer
- Universal label: no Worx page we read uses the word. The extension kit is described as designed “in conjunction with the boundary wire included with the Worx Landroid.”
- Gauge: 18 AWG on Worx’s WA0184 extension kit page.
- Maximum perimeter: 984 ft of boundary wire, per the WR149E installation manual.
- Distances: 26 cm from a step, 10 cm from a flush edge, and at least 30 cm from a pool.
- Pegs: about 80 cm apart, closer at corners, turns and dips.
Is there a universal boundary wire for Worx Landroid?
No Worx page we read names a universal wire, so treat “universal” as a sales word rather than a specification.
Worx’s product page for its WA0184 extension kit says the wire is designed to be used in conjunction with the boundary wire included with the Worx Landroid. That wording ties the extension to the system Worx ships. The page does not state a material, a burial rule or a maximum length.
A generic wire could fit, but the sources we read do not test third-party wire against a Landroid. The checks that matter are gauge, material, connector type and total length, and any universal boundary wire for Worx Landroid would be judged on those same numbers. The manual sets the last three for each model. If you are new to wire layouts, what a boundary wire does covers the basics.
Gauge and material: what the published numbers say
Worx lists its wire by AWG, while the Husqvarna page we read quotes an outer diameter in millimeters. The sources do not convert one into the other, so compare like with like.
| Product | Gauge or diameter | Length on the page | Source |
|---|---|---|---|
| Worx WA0184 extension kit | 18 AWG | 165 ft extension | Worx product page |
| Husqvarna standard boundary wire | 2.7 mm outer diameter, no AWG stated | Not stated on the page we used | Husqvarna product page |
Anker’s installation guide says an extension should match the original wire’s thickness, material and electrical resistance. For a Landroid, that means matching the Worx gauge first, then checking material and resistance. We did not find an AWG-to-millimeter conversion in the sources, so do not assume that 18 AWG equals any particular millimeter figure.
Layout rules that decide how much wire you need
Worx’s layout rules fix the edge distances and the straight runs at the charging station. Measure those before you order wire.
| Layout point | Worx figure | Note |
|---|---|---|
| Edge with a step | 26 cm from the edge | Set with the supplied gauge |
| Edge flush with a path of the same height | 10 cm from the edge | Set with the supplied gauge |
| Edge bordering a pool | At least 30 cm from the edge | Manual minimum |
| Neighbor’s robot mower wire | At least 1 m apart | Avoids possible interference |
| Leaving the charging station | At least 30 cm straight before any turn | Not needed if the wire turns right at once |
| Entering the charging station | At least 80 cm straight | Manual docking requirement |
| Corners | Angle greater than 90 degrees | Lets the boundary sensor detect the wire |
| Slopes | Mower handles up to 35% or 20 degrees | Keep wire off the bottom of a 17 to 35% slope |
Measure the layout before you order a universal boundary wire for Worx Landroid, since these distances decide how much wire you need. Place the charging station first, because the wire starts and ends there. The manual asks for a spot no more than 10 m from an AC outlet, with a GFCI outlet recommended, in shade if possible, on flat ground, and away from irrigation sprinklers. A station can sit on a hard surface such as a walkway only if that surface is level with the lawn, with no steps.
The manual tells you to use the supplied wire distance gauge to set the 26 cm and 10 cm distances. Our reading is to measure each edge type before you cut any wire, because the distance depends on what sits beyond the edge.
Off-limits areas need the wire to loop around them, with 26 cm from the area edge and at least 1 m from the perimeter wire. A passage narrower than 61 cm needs a user-defined zone so the mower can reach the far side.
Length limit, extensions and repairs
The total perimeter must stay at or under 984 ft, so any universal boundary wire for Worx Landroid still has to fit under that total. The WR149E manual says: do not exceed 984 ft. of boundary wire: this is the maximum length of the boundary wire perimeter.
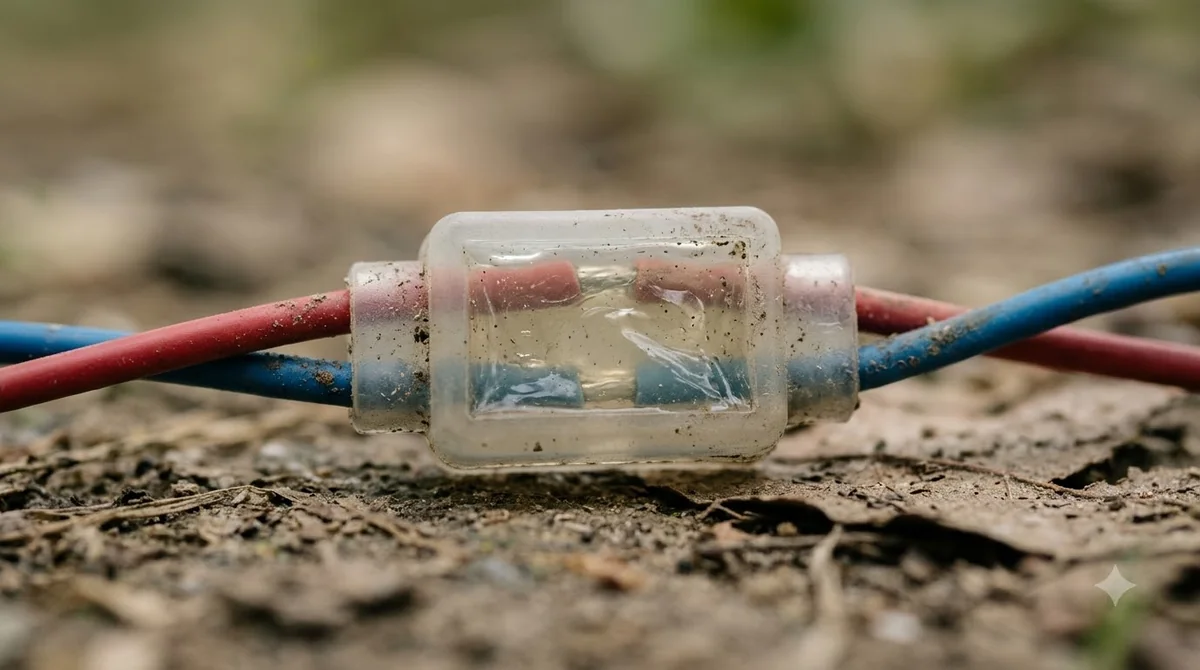
Worx includes two small waterproof connectors, and boundary wire repair kits cover the same job for other mowers. The manual lists three uses for them: a long perimeter that needs more wire, a cut wire that needs repair, and a later change to the garden layout.
Heads up
The WA0184 kit adds 165 ft. Add that to the loop you already have before you check the 984 ft limit.
The manual describes the join method: insert both ends into two of the three holes without stripping, press firmly with pliers until the blue clamp seats, then tug each wire to check it holds. It also warns against taping the wire or using a screw terminal block, because soil moisture can oxidize the wire and break the circuit after a time.
Pegs, burial and the test run
Worx’s manual says the wire is designed to stay on the surface and will be engulfed in soil within a few weeks. Burying it is optional.
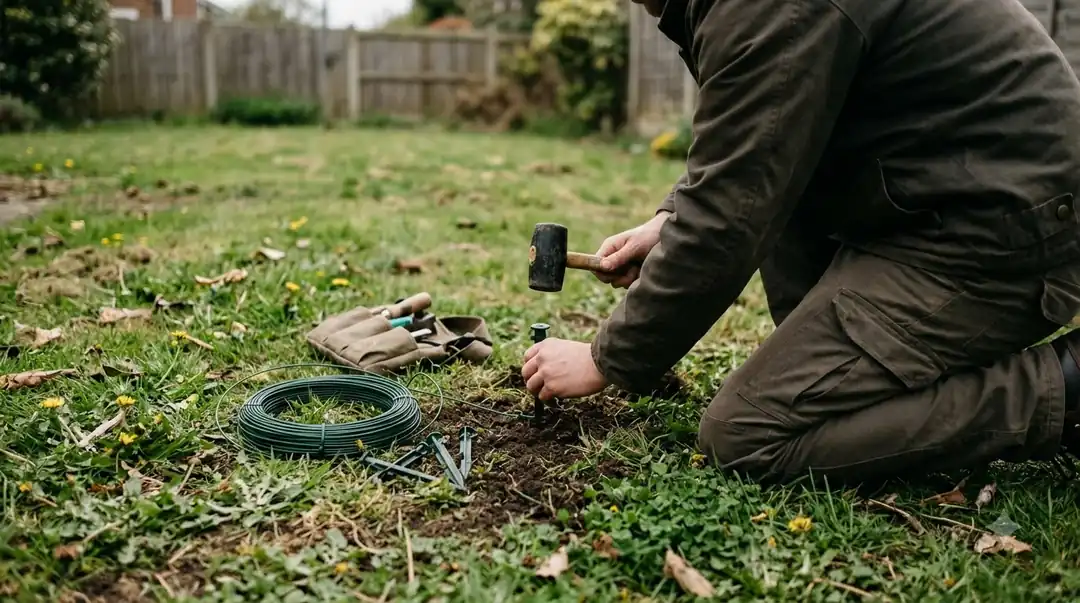
- Peg the wire first. Hammer pegs about 80 cm apart, closer at corners and dips, so there is no slack.
- Run a test. The manual recommends pegging the loop and running the mower around the perimeter before you bury anything. Anker suggests a test of 2 to 3 weeks.
- Bury only if needed. The Worx manual says no more than a few centimeters below ground. A general Robomow guide gives a laying depth of 3 to 7 cm, with 4 to 5 cm the usual target, and warns that 1 to 2 cm can let the wire resurface when you scarify.
The Robomow depth figures are general, not Worx-specific. Our reading is to follow the Worx manual first and treat the depth numbers as a cross-check.
Before you buy wire for a Landroid
Check these five points against your manual before you buy a universal boundary wire for Worx Landroid.
- Model and manual. Find the manual for your exact Landroid model (choosing a Worx Landroid model helps if you are still deciding), because the distances and limits differ between models.
- Total perimeter. Add the loop length and any extension, and keep the total at or under 984 ft. If the signal drops later, troubleshooting a Landroid that loses wire signal is the next stop.
- Gauge. Match the 18 AWG on the Worx extension kit, or the gauge your manual lists.
- Connectors. Use waterproof connectors of the type Worx includes, and avoid tape splices.
- Layout. Measure step, path and pool edges to set the 26 cm, 10 cm or 30 cm distance.
Frequently asked questions
Is there one universal boundary wire for every Worx Landroid?
No page we read says so. A universal boundary wire for Worx Landroid is not a term Worx uses. Worx sells the wire as part of each Landroid system, and the manual for each model sets the layout and length rules. Check the manual for your model before you buy a generic wire.
Can I use a different brand’s boundary wire?
The sources we read do not test third-party wire. Anker says an extension should match the original wire’s thickness, material and resistance, so compare those specifications before you buy.
How long can a Worx boundary wire perimeter be?
The WR149E installation manual gives 984 ft as the maximum boundary wire length. Other Landroid models may differ, so check the manual for yours.
Do I have to bury the Landroid wire?
No. Worx designs the wire to sit on the surface and says soil will cover it within a few weeks. If you bury it, peg the wire and run a test first.
Sources
- Landroid Boundary Wire Kit WA0184 (Worx): 18 AWG, 165 ft extension, compatibility statement.
- Landroid installation manual, WR149E (AU) (Worx): 984 ft maximum, wire distances, peg spacing, connectors, zones and off-limits areas.
- Standard boundary wire 2.7 mm (Husqvarna): 2.7 mm outer diameter, no AWG stated.
- Robot lawn mower boundary wire installation (Anker): extension must match the original wire; two to three week test before burial.
- How deep must the boundary wire be laid (Robomow): general laying depth of 3 to 7 cm.
 Up next8 min readGearBest Garage for Worx Landroid: Match Your Model FirstUpdated Nov 14, 2026
 8 min readGearWorx Landroid Spare Parts: What Exists and How to Match ItUpdated Nov 19, 2026
 9 min readGearWorx Landroid Replacement Battery: Fit, Swap and 1-Year WarrantyUpdated Nov 19, 2026
 7 min readGearHow to Change Worx Landroid Blades in 7 Simple StepsUpdated Nov 19, 2026
 8 min readGearWorx Landroid Accessories Worth Buying: 4 Essential PicksUpdated Nov 20, 2026
 7 min readGearWorx Landroid Replacement Blades: Pack, Timing, and FitUpdated Nov 20, 2026